The garden is thriving. it now covers over 1,660 square feet. Of that "mileage", one plot is for corn, another for hulless oats, and the last is the growing area is where a spa used to be. We normally grow organic tobacco there. We have a good year-worth or so put away. This year will be green beans, pole beans, and a little mustard. That particular area now has trellis (fence) around it that will support peas on the longer end and cherry tomatoes on the shorter end. The area is shaped sort-of like a long triangle.
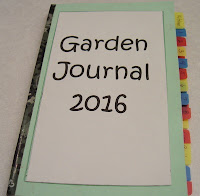 For the last 3 years, I have been making myself a "Gardening Journal" that starts with a calendar, showing what phase and sign the moon is in for that month. Yes, I garden by the moon. Only one scientist confirmed this method as valid, never-mind that small farmers had used moon phase planting for centuries in various countries. It does increase the yields by quite a lot, though, Nature has a large role in farming successes and failures, too. Of course.
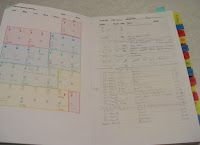 I use the method for making a book shown by Michael Shannon- Make Your Own Moleskine-Like Book . I use MS Word, the older one from 2004 or something, detesting the newest version. There is the option to make a booklet. It is laid out and printed on 8-1/2" x 11" regular pieces of paper that gets folded in half. The bookmaking procedure goes on from there. Laying it out right can be a booger if one wants certain things to the left and the right. Make a dummy and remember that there is a front and back at the end, if that makes sense. I make the pages in one to three sheets-worth of pages. Read about how to make one for the correct terminology and how-to.
 I use card stock for sewn-in dividers and the cover. I use button thread, it is durable enough for my journal. I glue the binding
with regular Elmer's, then put duct-tape along the edge. It holds up well through the growing season. I found tabs that stick in so I can find each garden bed quickly. The garden is divided into areas and each bed has its own tab with layout, an area list what is planted where so I can be sure what is planted in a spot is not a weed. Laughing, I did that once to some poor green onions... pluck-pluck-oops!
I use card stock for sewn-in dividers and the cover. I use button thread, it is durable enough for my journal. I glue the binding
with regular Elmer's, then put duct-tape along the edge. It holds up well through the growing season. I found tabs that stick in so I can find each garden bed quickly. The garden is divided into areas and each bed has its own tab with layout, an area list what is planted where so I can be sure what is planted in a spot is not a weed. Laughing, I did that once to some poor green onions... pluck-pluck-oops!I make notes in the calendar area of what needs planting and when, plus list when the plant comes up. This keeps me informed on whether the seed is good, or if I messed up somehow. The separate bed areas also list when veggies should be ready or close to ready to harvest, if I fertilized or if that area is due, etc.
 The final book is the right size to take into the garden, make notes and to use while planting, having all the info needed for each variety of veggie I plant. This may seem too anal-retentive for most people. I found my notes have helped me to plan and plant with a lot more success than without my book. It is very helpful for the next year of planting, seeing what works well and what does not. Remembering last year's details is no longer a problem. Our growing season is 90 to 126 days. With that short of a growing season, coupled with cooler weather than most other regions, I use all the tools I can to get the most out of my time.
 Now for last Saturday's photos. The first photo is of the meadow area that holds the hulless oats. Last year's wheat was planted by the scatter method. A huge mistake. Wheat is harder to gather that way and you cannot weed the area. (We do not use pie-zons.) We also do not have anything to make the processing easy- like slaves (children) bent on making some money to help us. Being middle-aged, we wanted grains we could grow and process without having any major equipment expenses, we cannot afford them anyway. Hulless oats are supposed to be cut, whacked against the side of a (new/clean) metal garbage can interior (to catch the grains), than the chaff/wind thing done. We shall see if it is more to our level and if we get enough to make it worth continuing. I planted in 21' x 1' rows with enough room to weed and tend the oats. So far, watering and weeding is a breeze.
 Before one reaches the grain area in the meadow, is the boxes with dry beans and potatoes. I planted the beans today- Vermont Cranberry and Black beans. 324 of each variety. I presoak the large seeds, something I found to be better for germination in my area. We get enough beans for soups for a year, sometimes enough for mashed "refries". Be thankful dry beans are cheap at the stores. It takes a lot of bean plants to fill those bags. American farmers are looking to drop them and grow hops and other crap for the micro brewers. Be warned, the prices may go through the roof. "Why eat? Get drunk instead!" will be their motto? ugh... The potatoes are just now breaking the surface. That means you see boxes with nothing in them. After years of trying all the methods for growing potatoes, digging a trench and filling it in as they grow is the best for us. NO MULCH, especially straw! Grasshoppers and earwigs love mulch and straw. They are easy to control around here if I do not mulch at all. When you click to see closer, you can see the fencing around my poor elderberry "behind" this garden bed area. The #$%#$% deer got it last fall. Too bad I detest venison.
 The main garden is on the kitchen/great room/bedroom side of our tiny house. It consists of two 3' x 12' beds for strawberries (with ghetto wire netting to protect them from the ponderosas), seven 3' x 12' beds and one 3' x 6' bed for various veggies. On the northish side of the trellis going down the middle of each of the veggie beds, I plant veggies that prefer some shade or cooler temps. The veggies that prefer full sun and warm to hot temps go on the southish sides. In the 8 non-strawberry beds, I grow 19 different veggies of various varieties. This area is my most labor-intensive area, especially with those stupid ponderosas still standing. You can see the chicken coop to the very back of the photo. The coop is placed for our easiest convenience, especially when winter comes. The pines by it will stay for shading the coop.
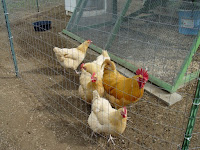
 The strawberry beds are the first beds by the coop in the photo above. The chickens love that. When Himself gathers strawberries, he tosses the "retards" and ones a bug got to over the fence to the chickens. They love strawberries. They watch me tend the boxes while pacing back and forth, hoping their treats are appearing. No yet. You cannot see the spinach or peas, that are growing quickly.
The photo to the right show the end area with herbs and onions. I give the onions a "haircut" when they get about 8" long, repeating it when they get another 1' long. It forces them to bulb more quickly, at least, it does for me. These last 3 beds will have the tomatoes and peppers. They do well in those beds.
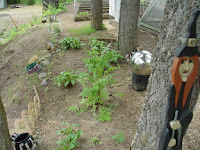
 The slope that comes down from the kitchen garden area is a nightmare that I am correcting. There is nothing to keep the sandy dirt from eroding. The stuff I planted has invasive root systems, and look to be slowly doing what I need to keep the slope from deteriorating. I finally got peppermint established, along with yarrow. There are a few wild flowers, calendula, borage, and flax. The peppermint and yarrow have the best roots for that slope I have to keep them back away from the two boxes for winter squashes and pumpkins. On either end of the slope is a baby raspberry and a baby blackberry bush. I need more of the berry bushes. I moved the blueberries to behind the strawberry boxes. They like it up there. We love berries. Having enough to can a goodly amount to share with our daughter and her family is our goal. If I show up without strawberry jam when we visit, you could park a truck on their bottom lips.
 This is the corn patch, to the left of the squash slope, or down the steps from the kitchen garden area. The owners had piled the rock for the septic system, then spread the rest for a "RV parking spot", a selling point to them. Trying digging or weeding it. Idiots. Using the weed whacker is bloody dangerous. grumble...grumble... We started building up this plot with chicken litter filled with chicken poop (of course). It was deep enough for last year's corn. Corn loves manure. This year, more chicken litter and the straw we used to prevent mud from being a problem in their area. The chickens break into teeny bits along with lots of manure to "sweeten" it for the first new layers of the corn patch. (We have not brought down the latter yet and spread it). We will get some dirt this week for the final dressing. The corn held well last year, producing the best ever for us. I think adding more dirt will be even better. The back right 3' section will have a couple of sunflowers. No corn. Not enough sun during the day and it is too shaded in the afternoon because of a small maple bush/tree thing at the top of the berm wall. The bush hanging to the right front is a josta berry, with zillions of tiny berries ripening on it.
BTW- All winter we dump the contents from under the chicken's perch onto the various garden beds, even if there is snow on top of them. By time the snow melts, there is plenty of litter and chicken poop to nourish the beds quite well. It ages enough to be perfect for the garden, gives us a large disposal area for their leavings that does some good for the garden. A win-win situation. As I dig up the beds, looking for grubs and weed sprouts, I break up any poo that needs it and then get it all well mixed into the bed. The veggies love it. It is not too much to give leggy carrots, either. Chicken poo is your garden friend.

This is the back area, normally the tobacco area I talked about at the beginning. The Hillbilly Greenhouse will be there until June, giving way for extra green beans.
 The back area behind our teeny-weeny garage is iffy. I had medicinal herbs. Only the comfrey and feverfew did well. I moved the comfrey, leaving the feverfew in the back. It will take over the area by the end of summer. The front boxes to the left will hold ground cherries. From what I read, they should do well there. This is a new item for me. Trial and error rules when planting. Each area has its own micro-climate. One has to try different items in the spots until you find what fits. Even what the experts say about some veggies and herbs can be different than my results. Garden to what works for you. Do not insist on planting something in an area the experts say is the perfect one, but your stuff dies or the production is poor when you try the spot.
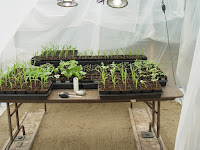 Last of the garden is the Hillbilly Greenhouse. We forgot to put a fan in there at first. Too moist, making fuzz and green-topped soil. I was afraid the corn I prestarted would mold in the dirt. I took the flats out dry up a bit and we added a fan. All is well. A lot of the contents will be planted next week. The tomatoes, maybe. Next week is our Last Frost Date. Our tomatoes, being varieties for our cool, short climate, should be fine. The peppers and corn will go out next month. Our soil is up to 60° to 65°. That is great, but peppers and corn do much better when planted in June.
The photos below are various shots taken on the same day as the garden areas. That is it for this post.
|




No comments:
Post a Comment