
The final straw was when the kids came to visit last month. Our newest grandson was at the furniture-surfing stage, walking within the first 24 hours, and crawling when he was in a hurry. His feet and knees were filthy on our supposedly clean carpet. It was disgusting, embarrassing and unacceptable to have my family on such nastiness.
We were going to rip out the carpet and paint the subfloor. A few rugs here and there, and live with it until we could save up to put in hardwood flooring. No, we do not do the credit thing unless it is an emergency. We feel it is irresponsible to get into debt, especially now.
I came across a couple of sites that showed brown paper flooring.
DIY Alternative to Wood Floors
The Ultimate Brown Paper Flooring guide
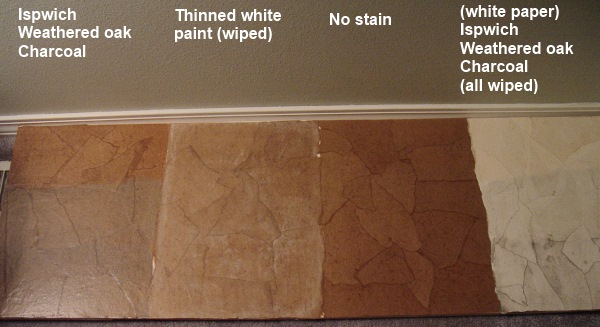 That looked much better than painting the floors. No one showed white paper. I prefer lighter flooring, though not particularly white in the great room or bedrooms. I did a test board of both papers. The plain white was ghastly. You would have to paint the subfloor white first and it would still not be appealing. I went over it again with green dye added to the glue. It came out Forest Service Mint Green. ugh! Making each batch of glue exactly the same tint would be a mess. I also did the white using the same stains as on the browns. You could get a marble-look, but it was still too cold-looking for me. The unstained was too poop-brown and on the cool side. The white-wash was interesting, but would also be a booger to get looking right from room to room, or even area to area. We have soft green walls with white trim. I went for the Ipswich Pine stain, which gives a slight red or cinnamon coloring. (I spelled it wrong on the photo...)
 We first unloaded the craft room and removed the carpet. I am refraining from showing what was under that carpet. (shudder) Each room we removed the carpet from, we gagged. Someone kept barnyard animals in the house, we think. the bedroom is the only room left with the carpet. the house smells clean. Yea!
 After papering the craft room, we covered it with tarps and now using it for the storage room as we move furniture in and out as I finish each room or area. I have some of the paper you get in packages from Amazon, and used it in tiny bits around the edges of the craft room. That floor is not stained or sealed yet, as I said above, but it should look cool when finished, what floor shows when I put my stuff back, that is.
The seams in the subfloors are a booger. I did a good job filling them and the nail holes in. The spare bedroom has a very apparent seam that did not really show up until I sealed the floor. Of course. In the great room, halfway done, I laid paper on either side of the filled seams, them put paper over the center of that area, if that makes any sense. They are not as pronounced as the spare room floor shows in the photo. A scatter rug will hide it a bit. I can live with it. It is far from perfect, but it is only paper. I could re-paper over the area later on to try to even it out.
 I will take photos when completely done with the floors. I am doing every room but the bathrooms. Yes, the kitchen and dining area of the great room is getting done. The vinyl on that area is over 10 years old. I clean it and it looks dirty within hours, no matter what I do. I had a few scratches into the spare room when we put the giant bookcases in that room, the craft room being filled. I did a test of using a dab of sealer, and it does not show. Cool.
 Oh... I used up the paper I got from Staples on the spare bedroom floor and in the craft room. I bought a huge roll of Kraft brown paper, 3' wide by 1000' long from Amazon. The Staples paper came out darker and duller under the satin sealer. (I did not want shiny-glossy floors) Oops? Interesting? Does it matter in a small house filled with furniture, and soon, scatter rugs? (grin)
The brown paper flooring is coming out to be around .39 cents per square foot. Affordable. Easy to cover later on. I also bought gallon jugs of the Elmer's Glue from Amazon for an excellent price. The stain (oil-based and stinky) and Varathane sealer (water-based and not stinky) from Home Depot. It will be good when we get the wood stove installed. I already have the cement board for the bottom and surround backing from my potting days. I used it around the walls to protect them from the kiln heat. I still have to get the tiles for the "pad" and the surround on the walls after putting up the cement board for the area and a good hearth rug. Since the flooring is an easy fix, we will not have tiny burns on a carpet like our other houses did from the wood stove.
I think with a round wool rug in the great room and others here and there, it will look just fine all together. The floor IS slippery. I will have to have non-skid on the bottom. I made felted bottoms for the furniture I move when cleaning. Rubber on the bottoms of the legs of our small dining table and chairs. I do not want those to slid easily. It would sitting down to eat rather... interesting. (laughing)
This is not easy work nor is it very entertaining. The prep takes time. Gluing the paper down? Have a good movie playing or listen to music or a book on tape. I am using various torn shapes, making the floor look stone-ish. I can tear a piece to fit, or just over-cover it, as long as there is a good 1/2 of an inch over-lap. Have good knee-pads. I have a pair for the puttying and sanding stage. A softer pair for the sealing stage. While papering, I sat on a pad and scooted it as I worked.
Oh, this is important. Be sure to put towels at the bottoms of the doors when sanding after puttying the floor. When the carpet is removed, you have gaps under the doors. when I sanded the great room, I forgot. I did the whole living area. I realized what I did and spent the evening scrubbing the house. Then Himself opened a kitchen cupboard. Oh yes, the dust got into every cupboard. I was up all night scrubbing the insides of the cupboards, washing everything inside them, too. What fun that was. Not.
The floor is warmer on the feet than vinyl or linoleum, but not as padded. Try as I would to keep them out, the floor has Sally and Debbi mementos... our hairs here and there. They are not noticeable because of the way the paper and stain are lain unless you get your face down on the floor. I cannot afford the tiny baseboard filler stuff (Quarter round or horseshoe board- It is almost 50 cents a foot and comes out quite high in total to buy, even for a tiny home), so I rolled paper after the papering stage and lined the area under them with it, stuffing it with a ruler tightly into the area. I then stained and sealed. It would look nicer to get the filler base boards, but so little of the walls show and with my cheap fix, it will keep spiders or whatever from coming in. Ripping the baseb ards off, repainting the walls and all that would be horrendous and expensive. The boards are over 10 years old, tending towards breaking if removed. We do what we have to do in a pinch.
I never thought of decoupaging my floors, which is what this is. I am certainly not trendy or PC. I do, even when it is hard work, like learning new things and doing something myself, if possible.
I just wonder if I am ever going to finish some days when the sealer needs at least 3 days to cure and I am itching to get this done so I can move on to my next projects.
Linked in with:
Frugal Days Sustainable Ways #84
Wow! Paper? This was a very first for me. Thanks for sharing such an unusual story. I'll share.
ReplyDelete